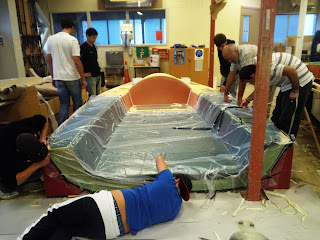
Like I discussed earlier the glassing of the deck was considerably different from that of the hull. For one, we used a different type of resin. The hull was a room-temperature cured epoxy while we used APR and APH that used a 4:1 ratio by weight on the deck which requires the deck to be heated/cooked to fully allow the resin to harden. One benefit of this is that the deck does get stiffer but also allows us to have a considerably longer pot-life. We could work at our own pace in getting down the peel-ply and everything else needed to vacuum. The second difference is the stack. The stack is the different layers of glass peel-ply and so forth used before we could walk away and say finished job. I will go through the layers one by one. The glass was the first thing to go down. The glass on the outside of the boat, not just the deck, is EDB400. This means that the glass is a double bias with the direction of the fibers crossing at 45 degrees. The 400 signifies the weight of the cloth in grams per square meter. After the glass is the resin. We typically do not record the resin in the stack but I like to because it removes doubt as to when the resin will be applied. We tried to have a 50/50 ratio by weight of resin to glass. The next layer is peel-ply. This is so the glass takes on the feel and shape of the peel-ply as well as protecting the glass from contaminates until we need to paint or attach something else. The glass and peel-ply need to be laid down and smooth out so that there are no wrinkles or air bubbles and ensuring that there is the right amount of resin. The rest of the layers do not require such care. Perforated plastic goes down next which allows the rest of the layers to comes up easily as well as a way for excess resin to escape from the glass and peel-ply. Next is mesh. It does not really matter what type just as long as it allows air to flow freely from every part of the bag to the vacuum. (What would happen if one section of the vacuum sealed off before all of the air was removed?) After this we put down the vacuum bag. This is not so much a bag a a big piece of plastic that has no holes. We line the edge of the foam with vacuum tape, similar to puddy but is extremely sticky. We then go around and seal then edges of the bag on the tape. This part is done pretty much how you want with no specific right or wrong but you need to make sure that you have plenty of bag and put in many 'darts' in order to eliminate all chances of spanning. Darts should be put as you see fit. We always tried to put in too many because too few could cause the vacuum to span and bend the foam out of shape or snap it all together. We wrapped green mesh down into the vacuum hose as well and laid that over the other green mesh allowing for the hose to have plenty of bag around it so that it did not crease the foam underneath if it spanned. After the vacuum is turned on we go around and listen for leaks or holes along the bag and try to fix it. We had a gauge set up so we could see if we had a perfect seal or not.
When we applied the resin to the aft part of the deck where the transom was we had to be extra careful. if the resin ran down where the vacuum tape need to go then the tape would not stick and therefore possibly ruin the vacuum all together. We applied tape to the edge in order to try to fix the problem before it happened but it did not work. We spent several hours after class was technically over trying to get a good vacuum seal but nothing was working. we ended up needing to cut off a portion of the transom in order to get some type of a seal but it still was not perfect.


No comments:
Post a Comment